
Hello Crafty Peeps, and thank you for stopping by.
This last few weeks have been hectic and I've only now found time to post my next project towards my AECP Level 3, after taking Amber Davis's 'Zentangle for Cardmakers' class. I would encourage you to have a look at Amber's class, as she perfectly demonstrates how Zentangle can really bring some additional interest to your card making.
Now, I'm not a patient person and I found this class quite a challenge because it is the repetitive practice of Zentangle which brings results rather than the immediacy of, say, using stencils or stamps to achieve the end goal. But, in the end, I did manage to find my zen and produce two cards, which, whilst they do not directly use the patterns that Amber demonstrated in her class, are recognised tangles (Cadent and Crazy 'NZeppel).
Card One
This first card is my take on the Crazy 'NZeppel pattern, which I applied to a die cut ampersand.

I created a background using stamps from Altenew's 'A Study in Watercolor' set, and stamping with Saltwater Taffy Distress Ink to fill the card front panel (Neenah 80lb Classic Crest). I then took the 'Fine Tulle Stencil' and using only the ink left on my yellow blending brush, I lightly applied some ink through random areas of the stencil. That done, I used my Altenew Jet Black ink cube and popped some ink onto an acrylic block, sprayed it with some water, and used a small brush to flick some splatter over the background.

Then I turned my attention to the die cut. I chose to use the Crazy variation of the Nzeppel pattern to cover the ampersand in rounded 'tiles', using a dark grey Copic marker to fill in the background and a range of pinks, working inwards from dark to light, to colour each tile. Traditionally, Zentangle is produced only in black and white with shades of grey, but I love the idea of colour, as you will know by now.

I cut a couple of extra ampersands so that I could layer these under the decorated one, to give a little dimension. To ensure there were no bright white edges to the finished stack, I coloured the edge with a black pen, which also gives a little more definition to the stack.
I have recently purchased some Wordies Sentiment Strips from Creative Expressions and I thought I would try these out on this card. They come in white with black lettering and black with white lettering, which are the ones I chose here. The sheets are easily cut and, again, to ensure the white cut line wasn't visible, I edged each of the cut words with black pen.

To finish, I affixed all the elements of the card and popped on some beautiful black gems for a final flourish, and made a co-ordinating envelope.
Card Two
I wasn't having much success with some of the patterns Amber demonstrated in these lessons, which is no reflection on Amber, who is super talented and a very good teacher. I'm not sure what the barrier was - I suspect my shaky hand and hay-fever eyes contributed to my less than successful attempts - and I was disappointed not to be able to do more justice to this brilliant class. I decided to look up some other tangles and came across 'Cadent', which, through simple lines, created an almost basket weave effect, and could be shaded for more dimension.
To help with placement, I had the idea to stamp the 'Dainty Swiss Dots' background stamp in a pale grey, and used this grid of dots as a guide to create the pattern.
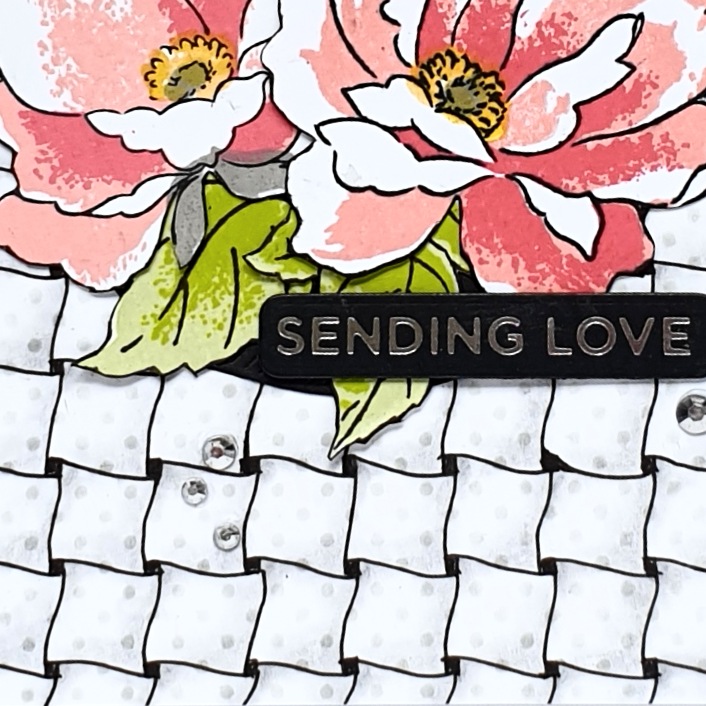
Having successfully completed the whole card front with this tangle, I added a little shading in graphite pencil and trimmed the panel to 4" x 5 1/4" before adding it to a 4 1/4 " x 5 1/2" top folding card.
To contrast with the quite regimented background and to bring some femininity to the finished card, I chose to stamp with the 'Airbrushed Flowers' stamp set, using a selection of Distress Inks and Altenew Crisp Dye Inks in pinks and greens. I fussy cut the stamped images and arranged them on the card front, but realised they needed a little something to 'ground' them on the card, so I cut a circle out of black cardstock to place underneath the cluster of flowers and this was just the addition it needed.

I added some platinum crystals from Lucy's Cards for a little sparkle, and a foiled sentiment finished the card off. There was, of course, a co-ordinating envelope.
Despite my lack of patience, my shaky hands and blurry vision, I am happy with these two cards.
Until next time, keep crafting.
Supplies:
Please note that some of the links below are affiliate links and if you follow them and make a purchase I might receive a small commission, at no additional cost to you. This helps to support my blog.
For someone who doesn't have much patience, they're pretty fantastic results! In both cases, but especially the Cadence card, they look like they could have been stamped...but with the added bonus of having that mindful focus on creating them. Both cards are great but I confess that my favourite of the two is the Cadence. Yet another string to your bow Peri and always executed so very well.
ReplyDeleteWOW. I am speechless...
ReplyDeleteWow! Thank you!
Delete